Rox In A Box

Rox In A Box

Rox in a Box

Where is Roxanne Today?

Summer of  ’23

Rox Baby had a great summer when Flash & Jan had returned and setup camp at Riverview RV Park in Loveland Colorado. Flash drove Roxanne from her garage hole in the Fort (slang for Fort Collins) and out into the foothills of the Rocky Mountains. Roxanne provided pickleball transportation through that summer, but alas all good things must come to an end; Roxanne had to head back to her Fort Collins storage garage. Flash disconnected her battery and poured a fair amount of Stabil into the gas tank.

Beach House a Bust

The beach house was supposed to be finished June 1st, whereupon Flash & Jan would be living there and getting every room outfitted with new furniture and assorted amenities. The Topsail Island vacation scene kicks off Memorial Day weekend and goes full steam until mid September. They had hoped to have their ocean view marvel ready for renters by July 1st, and thus receiving rental income to offset the oodles of cash that had been slipping through their fingers since they had the idea to purchase land on the north end of the island.

With a new finish date of August 31st, it was crystal clear that move in and furbish date would have the home rent ready after the season had come to an end, and so a new plan was born. The traveling duo now plan to return to Loveland and move into the Micro Ranch; a half acre property  with views from the west foothills to Devils Backbone to the east. This property too will become a seasonal AirBNB rental, so it, like the beach house, will have to be furnished and outfitted.

Good News for Roxanne

At the Micro Ranch, Rox Baby will be moving into her own garage, this time with shop space! She’s hoping those rumored upgrades will become a reality. Will it be disc brakes? A new suspension would be nice. Maybe a Mustang II front end! Or how about shining up the stainless grill bars and putting them on over a new coat of paint?! Time will tell. A lot of her future will depend upon how lazy Flash is ;-P

April Update – Not Foolishness

April Update – Not Foolishness

I’ve been hunting for the perfect vintage looking tie down hooks for Roxanne. Finding what was I thought I wanted proved a tall task. I recalled a pointy vintage hook but the best I could come up with was a hand forged wrought iron hook. After ordering them from Garrett Wade I decided against them; I found the pointy ones! They were hiding in the awkward product pdf’s over at Vintage Power Wagons. Steve came to my rescue and those suckers are on their way.

More exciting still, I finally settled on an interior kit and from Vic’s Dodge Garage. Vic is doing original style; CNC cut panels covered as in the old days. While I’m very nervous about sag going forward, I did like that I could mix and match colors. Going with grey headliner with brown panels. I saw somebody else had done this and thought it looked nice.

His cost is misleading. While $425.00 sounds like a deal, when you factor in his shipping it get nuts. Good thing I’m rich. Check out the shipping estimate quotes from Vic’s in Oregon to me in Fort Collins, Colorado.


I’ve been leary of doing ABS, while I would appreciate the no sag factor, I just don’t think I’d like having a plastic interior. I think I’ll get better sound insulation with the old school vinyl wrapped boards. Yes, I’ve added sticky backed foam/aluminum sound deadener sheets up the wazoo. Finger’s crossed!

FWIW – Vic is a chatty guy who was incredibly helpful on the phone over a wide range of topics. And did I mention Vic’s website has color photos?

Door Glass Removal on your 1950-ish Dodge B Series Trucks

Door Glass Removal on your 1950-ish Dodge B Series Trucks

I’ve seen this topic discussed on various message boards, facebook groups and forums. The trouble is nobody really knows or can show you what you need to know to get the job done. I’m not sure I’m the guy to solve that riddle but what the heck.

The Shop Manual is woefully inadequate. Oddly I often see Dodge B series truck owners beat others over the head with “Did you buy the shop manual?!”. Well, I bought the shop manual, read the pages related to removing the drivers and passengers door window glass and still couldn’t figure it out all the  way, until Alec Benjamin Heier stopped by the home shop and showed me hands on what worked for him. His solution was drop dead simple and we had the glass out in under thirty seconds.

Steps Taken

Step 1
Remove the Door Handle and Window Crank. These have spring loaded escutcheons. Use one of your body tools or any thin wedge thingy to jam it in there and move it to reveal the pin holding the crank and handle to the post.
Step 2

Door Panel Spring Fasteners

Remove the inner door panels by removing the screws and prying out the door panel spring fasteners.

Door Panel Removal Tool Kit from Amazon

Tip: Pickup a gnarly nylon door panel removal toolkit from Amazon. Don’t cheap out. Some tough fasteners will only bend your tool instead of your tool bending those fasteners to its will.

You’ll want to use one of those pry tools to remove the window sweeper too. The glass won’t come out the opening with the sweeper still in.

Step 3

Remove the lower access panel. Easy peasy, six machine screws of substance. You might consider replacing these with shiny new ones?

Step 4
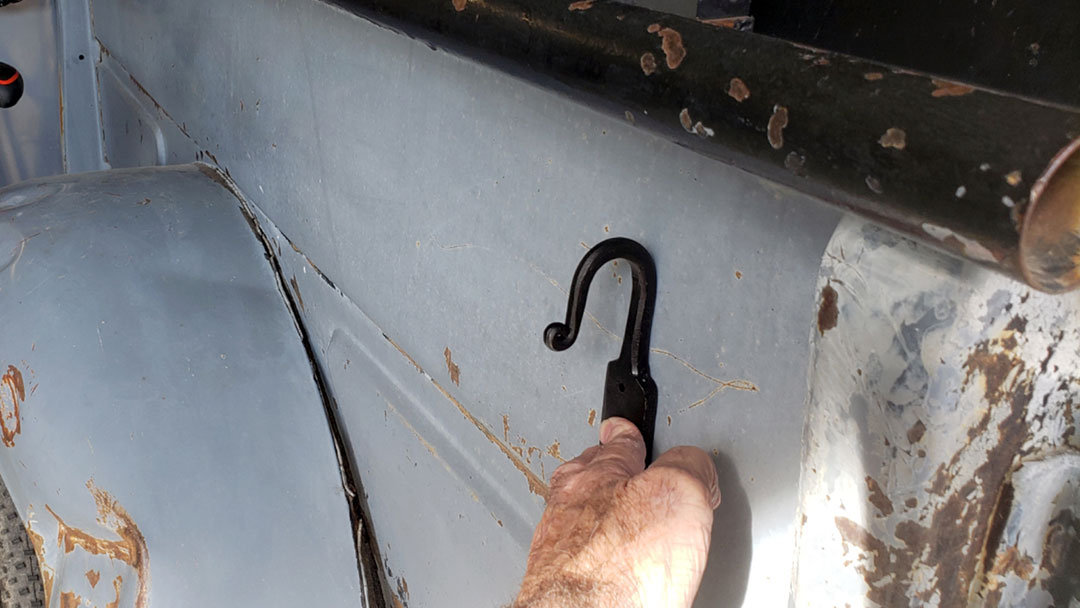
With the window rolled up. Remove the three bolts that are holding in the inner hidden window channel. These bolts are on the hinge side of the door and are vertically aligned.
Step 5
Remove the retainer clips behind the lower door window guide. This is the mystery part since you can’t see ’em and don’t expect this type of retaining clip. They simple press down to release, slide down and pull away from the channel; VOILA! This is the part Alec showed me. Drove all the way over for a thirty second job.

Step 6

The glass will lift up, rotate ninety degrees and come up and out of the upper door panel window opening.

Take your glass to any reputable glass house for replacement. I use Black’s Glass right here in Fort Collins. They took the glass still jammed in the channel with no complaints.

Note: getting that bottom channel off the glass can be a bitch. Alex recommends putting the glass in a large wood vice, then hammer it off using a piece of wood against the metal edge. Suggest heating it up to very warm, hot even to make it a little more slip friendly.

Vintage Dodge DIY Disc Brakes Conversion

Vintage Dodge DIY Disc Brakes Conversion

Vintage Dodge DIY Disc Brake Conversion

While I haven’t bitten the bullet yet I have been sorely tempted. Recently I ran across this post on the Facebook Dodge Pilot House page.

DIY Disc Brakes for yer ‘ol Dodge
by Derrick Laukaitis

Don Incoll came up with a great setup for converting the drums on his (wife’s) ’49 Dodge to a disc setup. Here’s an alternative I came up with years ago for my ’56 Dodge that utilizes all Mopar parts (plus a nifty bracket that can be made using a drill press, drill bits, a hole saw, basic grinding tools and a lot of patience).

Like Don did, you’ll have to remove the drum from your hub. Then, you’ll have to grind enough material off your hub to allow the rotor to slide over it. Also, like Don did, add a set of five wheel studs so you don’t have to wrestle with the lug bolts any longer.

I included the drawing I did years ago of the bracket that will need to be made. But, I strongly advise you re-measure your setup and do a mock-up with a different 1/4″ material (I used plexiglass) to ensure everything fits as designed. …Looking at my measurements again (with a few more years of experience under my belt, you will definitely need to re-measure).

Nearly forgot… You’ll need some brake hoses also. Honestly don’t remember what I did for hoses, but there a ton of options out there.

By the way, this setup allowed me to run 15×7 American Racing Smoothies.

The Recipe:

PartRock Auto Part #CostQty Parts Cost
Rotors18A924AC$28.792$57.58
Left Caliper18FR1083 $46.791$46.79
Right Caliper18FR1084$46.791$46.79
Caliper Brackets141200 $16.422$32.84
Caliper Bracket BoltsH17010$3.042$6.08
Wheel Studs7178B$2.1410$21.40
    Total: $211.48 (+ shipping)

Parts Gallery

Non DIY Method

Scarebird makes several disc brake conversion kits and changes are they have on for your vintage ride.

Refreshing Hubcaps

Refreshing Hubcaps

Refreshing Hubcaps

Taking off Fifty of the Sixty Eight Years
More...

New hubcaps could have been purchased for about fifty bucks each, but being a cheapskate at the time, I opted to slueth out hubcaps via the internet; ebay, facebook groups and the P15-D24 forum. I ended up with two pretty good candidates and fours that were on the sketchy side.

Removing the thick coat of rust from the backside took some elbow grease. I let ’em soak in vinegar for a few days then scrubbed them with steel wool and green meanines (Scotch Pads). The front sides I cleaned up with rubbing compound then applied a degreaser before I started the masking and painting.

Preparation

With 1/4 inch masking tape, outline the main circle. With 1/2 inch tape, add some margin to the circle then use newspaper to protect the rest of the hubcap. Use 1/2 inch tape to cover the lettering. Finally, cut out the letters. You can see some of my color testing here.

Primer

After using a paint prep degreaser, such as the one made by Dupli-Color, use an off the shelf primer. Think Rustoleum.

Color

First thought was to have a custom color blended by Finish Masters. However considering how rough these vintage hubcaps are it didn’t make sense, so off the shelf Dupli-Color rattle can that was “close enough” was selected and sprayed.

Rattle Can Coup

These were found locally here in Fort Collins, either at Home Depot or O’Reilly Auto Parts. Shake Rattle & Spray!

Many Moe & Jack

Many Moe & Jack

Many Moe & Jack

New Shoes for Roxanne

Over on the P15-D24.com and Pilot-house.com I was looking at @ggdad1951‘s FEF truck and see Mark is using what appears to be the original “yellow”. I recall him discussing it here and there. I think he referred to it as Armour Yellow.

When I learned that Les Schwab Tires would media blast and powder coat wheels for about 36 bucks each I pulled ’em off Roxanne and trucked over to the local franchise. The yellows they showed me were pretty lemon or orange, and none that looked like what Mark has on FEF.

I have remnants of the original yellow color; the pin stripes on my grill bars. When I measure with my colorimeter I get RGB 217 201 140. Yes, faded and sun tinted. What is the original color really, or more important, what color is it in today’s paints?

I came to a crossroads. The new plan was to media blast them and paint them myself, but not sure how to proceed. I’ve heard rustoleum has a color that is very close, or I can get a can mixed up and spray it myself, or ??? Since I’m was not planning a show quality restore, more of a general cleanup and preservation I found myself needing some counseling and advice to that end. The boys on the forum didn’t let me down.


Delfleet Essential Paint - soft yellow

Even with the experience of the Pilothouse Truck forum members such as @ggdad1951, I don’t think we’ll ever know re original color. I thought one of my front wheels still had a good sample of orig color under the hubcap but on closer inspection I can see it was repainted, and where it has chipped off it is showing a very faded buff color – almost light gray. I’d be happy with @Merle Coggins, Mark’s or @David A.‘s color. That notwithstanding, forging ahead was the only solution. A trip to Harbor Freight in nearby Greeley I picked up all the necessary equipment and most of the supplies, sans paint, I’d need to paint the wheel on my own (Fort Collins wouldn’t sell me the big compressor – they only had the floor model in stock).

A trip to Finish Masters in Fort Collins, armed with paint codes and a photograph supplied by forum member David A. I managed to get everything I would need to paint the wheel in my new paint booth, aka “garage”. I had already had the tires unmounted and the wheel sand blasted by a specialty shop twenty miles nearby in Loveland Colorado – They looked fantastic. Bright metallic silver. Who knew that was hiding under there.

OMG I Suck at Painting

Or the paint Store ripped me off! I was suspicious when I poured the recommended epoxy primer into the mixing cup then added the catalyst as directed by the paint Store and it was RUNNY – like water color. Am I missing something here or do I need professional help. Turns out I actually suck at painting. When stirred and mixed correctly the paint goes on pretty nice. Of course I had to wait until I sanded out all the drips, sags and runs to find that out. Epoxy primer is a bitch to sand, just so you know.

Epoxy Primer Mixing
Runny Dripping Epoxy Primer on Dodge Wheel

Making the decision to have the tires unmounted and the wheels sent out to be blasted was the commitment that would send me on this path of becoming halfway decent at laying down the epoxy primer and single stage urethane enamel. Starting on the back of the wheel at each stage set me up for having the front of the wheel look damn good.

The wheel paint job was shopped around at several Fort Collins auto body shops. The average price quoted was around $450.00! WTF?! I thought I could buy a compressor, spray gun and necessary supplies for less than that; I was wrong. It cost about a hundred dollars more than that and hours of my time.

Holy crap did I learn a lot about paint and painting. Turned out to be way more effort than I had anticipated. The boys on the P15-D24 forum really saved my bacon. Their advice there was spot on and I was able to use it and in the end be rewarded with five great looking wheels – even the color was exactly what I had in my minds eye.

Vintage Wheel, Modern Tire & 1950 Dodge Hubcap